| Donate |
Français |

 778Ko |

![]()
![]() Functions
Functions
A large number of functions are accessable via the various Ma Tirelire screens, so to simplfy the documentation we have decided to pull them all together in one big chapter rather than repeat ourselves.
![]()
![]() Sum type
Sum type
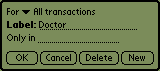
The principle of this function is to allow the user to obtain an account balance based on a date or a specific parameter...

|
This bar is at the bottom of the screen and is composed of two elements:
|
||||||||||||||||||||

|
The list has the following elements:
|
||||||||||||||||||||
|
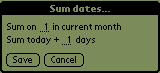
Tapping on "Dates..." in the above mentioned list gives you the following window. The labels are self explanatory. |
||||||||||||||||||||

|
When a date is displayed, the two small arrows allow to change the date without open the calendar box. In this case, a star appears on the right of the date to indicate that it has been modified. (see the example on left) |
||||||||||||||||||||
![]()
![]() Flagging
Flagging
Flagging one or more transactions not only allows the user to highlight them, but it also take advantage of the sum type function.
To (un)flag an operation the user should tap on the pennies/cents part of the amount of the transaction to be (un)flagged. A small, black, triangle will appear if the transaction is flagged (see transaction states).
The menu Flag gives access to actions associated to this flagging function.
![]() The first line of the
transactions list
match the initial balance of the account. This
"transaction" is always cleared and can not be un-cleared. In this
particular case, a tap everywhere on the amount will flag or unflag
this "transaction".
The first line of the
transactions list
match the initial balance of the account. This
"transaction" is always cleared and can not be un-cleared. In this
particular case, a tap everywhere on the amount will flag or unflag
this "transaction".
You can use the checkbox on the right of the account name in the account properties box too.
![]()
![]() Auto-clearing
Auto-clearing
You want to find and/or flag a special transaction? Ma Tirelire will
help you thanks to this function. ![]()
![]()
![]() How you can access this function:
How you can access this function:
- Par The menu Flag / Search & flag...
- Using the shortcut / H
|
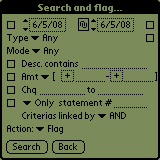
This screen allows to define your search criteria:
The line Criteria linked by allow to parameter more precisely your multi-criteria searchs. 3 values are allowed:
|
||||||||||||||||||||||||

|
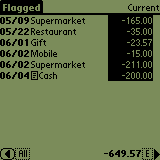
Yes!!!! Ma Tirelire found several transactions that match your search and flagged them. Tap on See flagged... to obtain the following list. |
||||||||||||||||||||||||
|
In this list you can see all the transaction flagged by your search but the manually flagged ones too.
|
||||||||||||||||||||||||
|
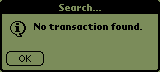
Bad luck |
||||||||||||||||||||||||
|
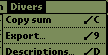
Note that you can export the results into the memopad. |
|||||||||||||||||||||||||
|
To do so, use the menu Misc/Export (this ligne is visible only from this scrren or the statistics one) or the shortcut / 9 |
||||||||||||||||||||||||
|
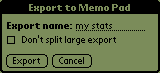
Choose the name of the coming memo, (here "My Stats") and it's OK.
|
||||||||||||||||||||||||
![]()
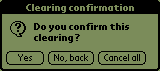
![]() Clearing
Clearing
This function lets the user precisely compare the transactions in Ma Tirelire to those present on the bank statement.
Setting one or more transactions to cleared allows the user to take advantage of the sum type function.
![]() The account balance before transactions are entered
(the first line in the list) is always marked as cleared.
The account balance before transactions are entered
(the first line in the list) is always marked as cleared.
After the user has cleared the Ma Tirelire transactions based on their
bank statement, the balance of your favourite programme should be
the same as that on your statement. If not then start looking for
the error... ![]()
![]() The pre-clearing
function will be a big help in solving your money related
puzzles.
The pre-clearing
function will be a big help in solving your money related
puzzles.
To (un)clear a transaction you just need to tap on the transaction sum (outside the penny/cent zone). The sum then appears in reverse colours (see transaction states).
![]()
![]() Aid to clearing and automatic clearing
Aid to clearing and automatic clearing
To help you to evaluate the situation on your bank statement,
Ma Tirelire provides you an aid to clearing screen which embed an
automatic clearing feature ![]() .
.
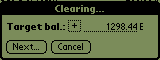
This function allows you to determine, based on the balance shown on the bank statement, the total sum of transactions required to achieve it. It's an inverted search!!!...
It is a very useful function if you know the account balance but not the detail of the associated transactions. For instance, that could be case if you get the account balance from an ATM.
![]()
![]() How to get to this function:
How to get to this function:
- Via the account menu / Clearing...
- Using the shortcut / L
|
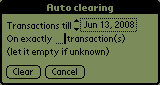
This first screen ask you the target balance. The amount you know and you have to reach by clearing the transactions.
|
||||||||||||||
|
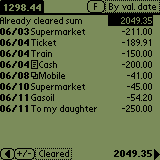
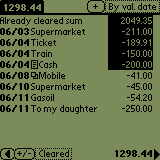
After tap on Next, in the previous screen Ma Tirelire lists the non cleared transactions. On the top line, we find:
The bottom line contains:
In this screen, you can manually clear the transactions to obtain the target balance by tapping on the amounts of each line. To gain time efficiently, tap on the ( C ) button at the top of the screen and see the result below. |
||||||||||||||
|
This intermediate screen allows to:
Tap on Clear to go to the screen below. |
||||||||||||||
|
Ma Tirelire computed and cleared the transactions who permit to
reach the target balance. You can of course correct an error by manually unclearing and clearing again some transactions.
The ( C ) button changed in ( + ) to tell that the automatic clearing just found a solution. If this solution does not match your mind, you can tap on ( + ) to continue the search. |
After automatic clearing, if you obtain:
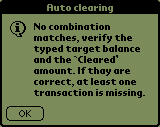
|
this screen, it's clear there is a problem with the listed
transactions:
|
||||||
|
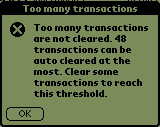
this screen, you have to help Ma Tirelire a little by manually clearing some transactions. Because if the number of non cleared transactions is greater
than 48, the computation will be to long and to complex for a
little pig. |
||||||
|
To quit this clearing screen, you have to tap the arrow at the bottom left of the screen. When some transactions were cleared on this screen, Ma Tirelire ask you what to do with them.
|
![]()
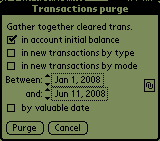
![]() Purge cleared
Purge cleared
The item Purge cleared... in the Account menu give you access to the following screen:
|
From this screen you will be able to delete in the account, the cleared transactions included between two dates to merge them:
|
![]()
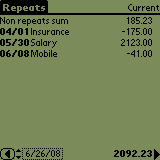
![]() Repeats list
Repeats list
To manage your repeated transactions in a trice, Ma Tirelire provides
you a specific screen to do it. ![]()
This feature displays only the transactions for which you defined a repeat (see Transaction properties).
![]()
![]() How you can access this function:
How you can access this function:
- Using the Account menu / View repeats...
- Using the shortcut / R
|
From this screen you can access to the transactions details and know the sum of your recurrent expenses. The first line brings together all non repeated transactions.
|
![]()
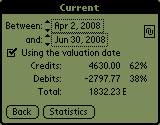
![]() Short statistics
Short statistics
If you want to evaluate the situation on your account, Ma Tirelire allows you to have a quick situation: the "short statistics".
![]()
![]() How you can access this function:
How you can access this function:
- Using the Misc menu / Short statistics...
- Using the shortcut / 8
|
This screen allows you to choose the selection criteria. You have to choose:
And you see in realtime, your account status. If you tap on the "Statistics" button, you will open
the Statistics
screen, of course...
|
![]()
![]() Statistics
Statistics
If you want to follow and analyze your expenses, Ma Tirelire will help you thanks to its statistics module.
To better appreciate statistics, you have to fill some transactions and to use some payment modes and transaction types.
![]()
![]() How you can access this function:
How you can access this function:
- Using the Misc menu / Statistics...
- Using the shortcut / S
|
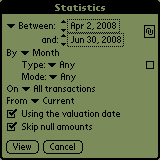
This screen allows you to choose the selection criteria. You have to choose:
|
||||||||||||
|
(1) To choose the time interval on which the search will be done, you can:
This last option is probably the quickest for standard periods,
as they are already defined
|
||||||||||||

|
(2) By tapping on the field following By (see the picture opposite), you can choose the slicing (see above). This slicing can be done:
|
||||||||||||
|
(3) If you chose a time period (see point 2) for slicing, you can refine the analysis by selecting: |
|||||||||||||

|
|
||||||||||||

|
|
||||||||||||

|
(4) By taping on the area following Sur, you access to a list that allow you to filter the transactions to be taken into account. |
||||||||||||

|
(5) The popup menu On allow to list the database accounts. Check in the list the accounts you want to analyse. |
||||||||||||
|
(6) This two options can be used to refine even more your
search. Their functions are explicit. |
|||||||||||||
|
Then you only have to tap on "View" to display the statistics following the criteria you just defined. |
|||||||||||||
As the number of possible settings is large, we choose to present
only one results example. (one of the most frequent ones, of course
![]() )
)
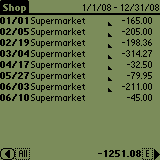
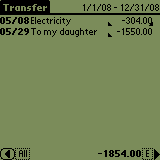
So here is, above, the results for a time period of analysis (1) of one year (2005), with a slicing (2) by month, with any types and modes (3), on (4) all transactions of "Current" account (5), using the valuation date and skipping null amounts (6).
|
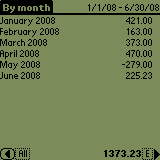
On this screen, you find at the top right the chosen slicing (2) and on left the search time interval (1). Each list line is a time period (2) (so a month in our example) with its total amount. On the bottom line
|
||||||||

|
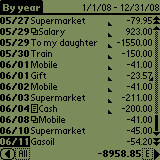
On the picture opposite, the list of choice which allow to change the sum at the bottom of the screen (see above.) |
||||||||

|
A long tap on a line allow to obtain the number of matched transactions and their account(s) name(s). |
||||||||

|
A short tap on a line open a contextual menu opposite. It allows to display the informations for the selected time period sorted by Type or by Mode or even all the matched transactions (View all). See below the 3 results that you can obtain. |
![]() In all screens below, you will find at the top the
slicing and the search time interval, and at the bottom the arrow
button to go to the previous screen, the small menu that acts on
the sum, the sum of all lines and the arrow to mask this last
line.
In all screens below, you will find at the top the
slicing and the search time interval, and at the bottom the arrow
button to go to the previous screen, the small menu that acts on
the sum, the sum of all lines and the arrow to mask this last
line.
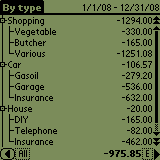
1 - If you chose Refine by transaction type
|
Ma Tirelire brings together the transactions by their transaction type (and their sub-types) used during the time period. At end of line, the sum of all transactions for this type or sub-type.
|
|
A long tap on a type or sub-type allow to see the number of matched transactions and on which account(s). |
|
A short tap on a type or sub-type allow to display the list of matched transactions.
Then, you can view the transaction details by doing a long tap on it or by editing its properties via a short tap. |
2 - If you chose Refine by payment mode
|
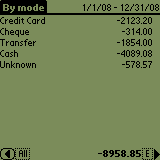
Ma Tirelire brings together the transactions by their payment mode used during the time period. At end of line, the sum of all transactions for this payment mode. |
|
A long tap on a payment mode allow to see the number of matched transactions and on which account(s). |
|
A short tap on a payment mode allow to display the list of matched transactions. Then, you can view the transaction details by doing a long tap on it or by editing its properties via a short tap. |
3 - If you chose View all
|
In this last case, you will see the complete list of matched transactions for this time period. As usual, you can view the transaction details by doing a long tap on it or by editing its properties via a short tap. |
It's great to have statistics, but it's better to be able to exploit them.
To do so, Ma Tirelire provide you a memopad export feature...
|
|
Use the Misc/Export menu (this entry is visible only from this screen and from the flagged list one) or the shortcut / 9 |
|
|
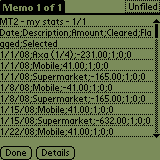
Choose the name of the coming memo, (here "My Stats") et le tour est joué.
|
|
Le nom du fichier dans le mémo sera "MT2 - Mes Stats - 1/1". Ci-contre un exemple d'exportation réalisée à partir de la vue (1) Affiner par type d'opération. |
![]()
![]() Descriptions and Macros
Descriptions and Macros
In Ma Tirelire it is possible to gain time by predefining descriptions of transactions that you frequently come across (pay, supermarkets, taxes...).
A recurring transaction often has similar characteristics each time you want to record it (same mode of payment, same type, same account).
To facilitate and speed up your inputs you can associate a "Description" to a "Macro" which will automatically enter those recurring transaction parameters.
![]()
![]() How it works:
How it works:
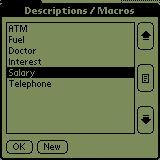
- You creat a "Description" with your recurring parameters (the "Macro").
- When you make a transaction you tap on "Desc :" and you list of descriptions will appear.
- You select whichever description you need.
- It's a miracle!!! Your default parameters are automatically
entered in the transaction.

![]()
![]() How to find the function:
How to find the function:
- Via the "Misc" menu / Descriptions...
- Tap on "Desc" from the transaction entry screen and choose "Edit..." at the bottom of the pop-up menu.
- Using the / D shortcut.
|
The arrows on the right let you move the description entry up and down the list. The button with the list icon lets to access the selected entry's properties. (see below)
Guess what the New
button does... |
![]()
![]() Description / Macro properties
Description / Macro properties
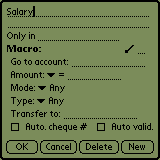
|
|
![]()
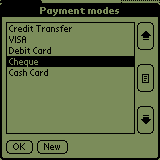
![]() Payment Modes
Payment Modes
Since your payment modes remain the same (Debit/Credit card, Cheque, direct debit, credit transfer, ...), to gain time you can predefine a list (the "Modes").
You can even define some parameters of your payment methods, such as the valuable date.
![]()
![]() How you can access this function:
How you can access this function:
- Via the "Misc" menu / Modes...
- By clicking on the "Mode" field in a transaction and choosing "Edit" from the drop down menu.
- Using the shortcut / M.
|
The arrows on the right of the screen allow you to move an entry up and down the list. The button with the list icon allows you to access the properties of an entry (see below).
New button... no
commentary... |
![]()
![]() Payment mode properties
Payment mode properties
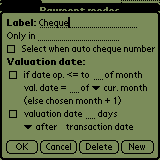
|
val. date:
I'm going to pass again on the button description... |
![]()
![]() Operation Type
Operation Type
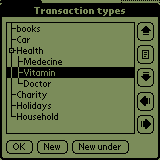
If you want to know how your budget is repartitioned (Car, food, ...) then the "Types" are for you.
You can create a list of purchase catagories ("type") to allow you to divide up and record your purchasing habits.
![]()
![]() How to find this function:
How to find this function:
- Via the "Misc" menu / Types...
- By tapping on the "Type" field from a transaction and choosing "Edit" from the drop down menu.
- Using the shortcut / T.
|
The arrows on the right of the screen allow you to move an entry up and down the list. The button with the list icon allows you to access the properties of an entry (see below). Hey, look! Something new on the buttons!!!!
|
![]()
![]() Transaction type properties
Transaction type properties
|
|
![]()
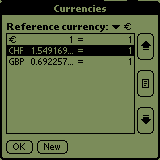
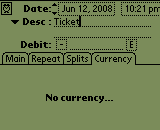
![]() Currencies
Currencies
You might need to do you shopping with another currency, for various reasons (travel, Internet shopping, ...).
To let you keep up to date with your accounts under all conditions, it is possible to define various currency exchange rates and associate them with your accounts or transactions.
To determine the account balances these currencies will be converted at the exchange rate entered.
![]() Fro an example of use, go to
the Currencies
use chapter.
Fro an example of use, go to
the Currencies
use chapter.
![]()
![]() How to find the function:
How to find the function:
- Via the "Misc" menu / Currencies...
- By tapping on the currency name (behind the amount) on a transaction and selecting "Edit..." from the drop down menu.
- By using the shortcut/ Y
|
|
||||||||||||
|
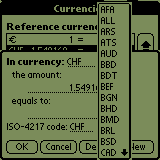
There are three currency creation methods: |
|||||||||||||
|
|
||||||||||||
|
|
||||||||||||
A last solution is to use the english freeware Currency4
Indeed Ma Tirelire is fully compatible with the currencies database of Currency4.
In addition, this software provides you a conduit to update the currencies database during each hotsync.
As you can see, Ma Tirelire can use two sources to update the change rates of its own currencies:
| the Ma Tirelire external currencies database | |
| the Currency4 currencies database. |
![]() Note
that Currency4
provides 146 currencies and Ma Tirelire only 97.
Note
that Currency4
provides 146 currencies and Ma Tirelire only 97.
You can install only one of these databases or both. In the latter case, if a currency exists in the both databases, Ma Tirelire will choose the most recent.
Great, is'nt it? ![]()
![]()
![]() Utilisation des devises
Utilisation des devises
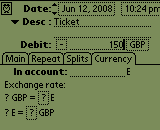
You are in London for a week-end, and you have to buy your return ticket in pounds.
Problem, the currency of your account is the euro one!
Ma Tirelire will help you to easily solve this problem...
|
Create a new transaction "Cash" |
||||
|
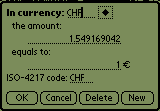
Enter an amount and choose the currency, here 150 pounds (GBP)
It is the most important step!!!... Tap on the ? surrounded with a dashed line and see the result on the picture below. |
||||

|
Ma Tirelire did a conversion (GBP => Euros) thanks to the change rate present in Currencies.
|
||||

|
Here is the result in the transactions list, the amount is displayed in euros. It is compatible with the other transactions amounts. No problem at all... |
![]()
![]() Changing the list view
Changing the list view
Maybe you would like to personalise the list view in Ma Tirelire, so
here is an example in colour. ![]()
|
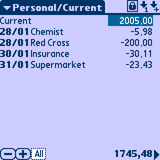
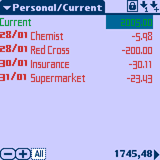
Here is the standard transaction list (before its transformation). |
||||||||
|
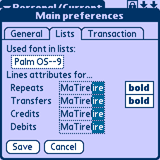
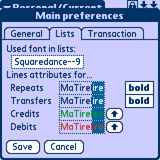
Go to the Preferences menu (via the menu Misc or the shortcut "/ P"). |
||||||||
|
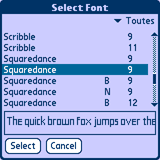
When you tap on the field Used font in lists: (here it is Palm OS -- 9), the list shown opposite will appear and then all you have to do is make your choice. To help you choose the font appearance is shown in a frame at the bottom of the scren.
|
||||||||
|
Select your colours for:
|
||||||||
|
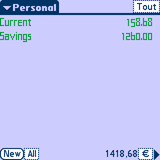
Tap on Save, sit back and admire the result. |
||||||||
|
Surprise !!!!... The account list is also modified.
|
![]()
![]() Wildcard characters
Wildcard characters
To provide more possibilities, Ma Tirelire handle the following special characters: * ? ! |
These special characters are only handled in fields Only in, Transfer to et In account (see Description / Macro properties, Payment mode properties et Transaction type properties chapters).
What character and why:
| * allows to match 0 or more characters | |
| ? allows to match one and only one character | |
| | allows to associate several different sets | |
| ! allows to exclude the parameters that follow it (always at the beginning of the line) |
Below, you can see some examples to better understand the use of these characters.
For these examples, we have defined the 6 following accounts in a database:
- ACC.007
- ACCOUNT
- account biz
- Account private
- Bankbook A
- Bankbook B
![]() For
In account and
Transfer to fields, only
one account can be defined. If your text can match several accounts,
Ma Tirelire will use the first match (alphabetic order).
For
In account and
Transfer to fields, only
one account can be defined. If your text can match several accounts,
Ma Tirelire will use the first match (alphabetic order).
| Your text in the field |
The result according to the field content | |
|
Only in (several accounts possible) |
In account ou Transfer to (only one possible account) |
|
| ACC.007 | ACC.007 | ACC.007 |
| acc.007 | - no match - | ACC.007* |
| AC | - no match - | ACC.007* |
| ac | - no match - | ACC.007* |
| acco | - no match - | ACCOUNT* |
| Acco | - no match - | ACCOUNT* |
| acc* | account biz | account biz |
| Acco* | Account private | Account private |
| ?cco* | Account private account biz |
account biz |
| Bankbook ? | Bankbook A Bankbook B |
Bankbook A |
| Bankbook * | Bankbook A Bankbook B |
Bankbook A |
| *book* | Bankbook A Bankbook B |
Bankbook A |
| A* | ACC.007 ACCOUNT Account private |
ACC.007 |
| ACC*|B* | ACC.007 ACCOUNT Bankbook A Bankbook B |
ACC.007 |
| !A* | account biz Bankbook A Bankbook B |
account biz |
| !A*|a* | Bankbook A Bankbook B |
Bankbook A |
| !?c*|?C* | Bankbook A Bankbook B |
Bankbook A |
| !A*|a*|B* | - no match - | - no match - |
* Ma Tirelire 1 compatibility mode. In this mode, without wildcard, the match ignore case and is anchored to the beginning of each account name
These examples are not thorough, so now try yourself... ![]()
![]()
![]() Number repeats
Number repeats
To keep the control over all your repeated transactions, you can set a number in the transaction description that will be raised by one for each repeat, or even set the month.
![]()
![]() How to easily and automatically number the repeated
transactions:
How to easily and automatically number the repeated
transactions:
- In the transaction description, you type a number between parenthesis. (4) for example
- You enable the repeat feature in the transaction properties
- In the description of next automatically created transactions,
the number will be raised by one. In our example, we will have (5),
then (6), and so on...
![]() For convenience, if you want to repeat a transaction 6
times, you can set (1/6) in the first one instead of (1). Ma Tirelire
will change the second into (2/6), and so on until the end of the
repeat. Note that Ma Tirelire take no account of the characters
following '/'.
For convenience, if you want to repeat a transaction 6
times, you can set (1/6) in the first one instead of (1). Ma Tirelire
will change the second into (2/6), and so on until the end of the
repeat. Note that Ma Tirelire take no account of the characters
following '/'.
![]()
![]() How to indicate the month for monthly repeated transactions:
How to indicate the month for monthly repeated transactions:
- In the transaction description, you type a month (or only the first three letters of it) between parenthesis. (January) for example.
- You enable the repeat feature in the transaction properties
- In the description of next automatically created transactions, the month will be changed to the next one. In our example, we will have (February), then (March), and so on...
![]() This feature is case sensitive, if you insert (JULY),
the next will be (AUGUST). Same for (july) and (august).
This feature is case sensitive, if you insert (JULY),
the next will be (AUGUST). Same for (july) and (august).
![]() It is possible to use the three first letter of the
month (Jan), (Feb), (Mar), etc. But after (May) we will always
have (June), as Ma Tirelire can not know if it has to abbreviate June
to Jun or not.
It is possible to use the three first letter of the
month (Jan), (Feb), (Mar), etc. But after (May) we will always
have (June), as Ma Tirelire can not know if it has to abbreviate June
to Jun or not.
Great isn't it???!!!!... ![]()
![]()
![]() Manage statement numbers
Manage statement numbers
When you clear you bank statements, you can associate each transaction to the statement number on which it appears.
To begin, you have to enable Statement # management line in the account properties.
The bank statement clearing is well handled in the clearing screen, but if you want you can clear direcly from the transactions list screen.
 |
The first time you clear a transaction, a contextual menu ask you the statement number. In our example the typed statement number is 12300.
|
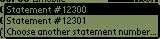 |
If you clear a second transaction, Ma Tirelire will propose you the last (and here just) typed statement number (first line), the next one (current + 1) and the possibility to add a different one. |
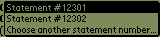 |
For the next bank statement, select the second line (next statement number) and Ma Tirelire will keep it as current one. |
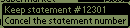 |
If you want to unclear the transaction, Ma Tirelire will propose you
to cancel its statement number.
|
![]()
![]() Dynamic description
Dynamic description
To provide you always more features, Ma Tirelire allows to make descriptions / macros dynamic.
To use the dynamic descriptions / macros, to have to add the following table values in the two first lines of the Description / Macro properties, they will be automatically replaced by a date, an hour, or other...
![]() In the following table, the examples are based on a
macro launch on January 5, 2005
16:30, in an account
named Main account, in a
database named My
accounts.
In the following table, the examples are based on a
macro launch on January 5, 2005
16:30, in an account
named Main account, in a
database named My
accounts.
The field "Transfer to" of the macro is set to Bankbook account.
| Value in the macro |
Result in the transaction description | Result in our example |
|---|---|---|
| %D | Date, short format | 05/1/5* |
| %T | Hour | 16:30 |
| %d | Day | 5 |
| %m | Month number | 1 |
| %M | Month full name | Janvier |
| %Y | Year | 2005 |
| %A | Name of currently opened account | Main account |
| %B | Name of currently opened database | My accounts |
| %x | Name of macro transfer account | Bankbook |
| %X | Name of currently opened account -> Name of macro transfer account | Main account -> Bankbook |
| %V | Clipboard content | My text |
| %% | Insert a % |
% |
* Date format is the same as the one you choose in the system preferences.
![]() You can mix all these values together to make a magical
description, see below:
You can mix all these values together to make a magical
description, see below: ![]()
- Macro description example:
- Transfer on %d %M %Y from account %A to account %x
- After macro launch:
- Transfer on 5 Janvier 2005 from account Main account to account Bankbook.
To go far, you can use advanced functions like these:
| Value in the macro |
Result in the transaction description | Result in our example |
|---|---|---|
| %M | Current month name | January |
| %-2M | Month name -2 months | November |
| %+2M | Month name +2 months | March |
| %-M %-1M |
Month name -1 month | December |
| %+M %+1M |
Month name +1 month | February |
| %-2D | Day date -2 days | 05/1/15* |
| %+6T | Current time +6 hours | 22:30 |
| %Y | Current year | 2005 |
* Date format is the same as the one you choose in the system preferences.
Here are some other examples of use:
- Transfer from a Bankbook account to the currently opened one:
- Bankbook -> %A (with Transfer to: "bank")
- Account interests on bankbook. They are given in january for the previous year:
- %-Y interests
- Month salary paid at the end of the month:
- Salary %M
- Month salary paid on 30th or 31th, so transaction always entered the next month:
- Salary %-M
To close this topic, here is the round feature that can be used with the ~ character.
In fact, the ~ allows to shift the change value threshold:
| %~Y (year): threshold = 30th june / 1st july (instead of end of year for %Y) | |
| %~m and %~M (month): threshold = 15 / 16 (instead of end of month for %m ou %M) | |
| %~d and %~D (day) : threshold = 12 / 13 heures (instead of midnight for %d ou %D) | |
| %~T (hour) : threshold = 30 / 31 minutes (instead of new hour for %T) |
Some examples are better than a thousand words.
|
|
|
||||||||||||||||||||||||||||||||||||||||||||||||||||||||||||||||||||||||||||||||||||||||||||||||||
A mix of all these elements opens many possibilities, so it's up to
you ![]()
![]()
![]() Search for a transaction
Search for a transaction
To find a specific transactoin, you can (must) use the search module included in PalmOS.
![]() The search work
on description, amount, cheque
number and statement
number, but also
on initial sold (strict
equality), the number
or note of an
account.
The search work
on description, amount, cheque
number and statement
number, but also
on initial sold (strict
equality), the number
or note of an
account.
To fully understand the search possibility, the table below show you many results for a statement:
| Search string | Transactions found are the ones... | ||||||||
|---|---|---|---|---|---|---|---|---|---|
| -100 |
|
||||||||
| +100 |
|
||||||||
| 100 |
|
||||||||
| >100 |
|
||||||||
| <100 |
|
||||||||
| >+100 |
|
||||||||
| >-100 |
|
||||||||
| <-100 |
|
||||||||
| <+100 |
|
![]()
![]() Keys use
Keys use
If your PALM has a Navigator keypad (PDA with PalmOS 5), it is possible to use it to do some interesting things.
In list screens:
if a line is selected:
| |||||||||||||
no line is selected:
| |||||||||||||
| the Backspace key (useful on Treo) equals to a tap on the quit button (at the bottom left). |
In all screens including some numeric editable fields (transaction amount for example, the Space key select all field content (useful on Treo). It allow to quickly delete or copy its content.